The Most Advanced SEO Autoblogger Right Now: ChatGPT Assistants API
Are you struggling to keep up with the ever-changing landscape of search engine optimization (SEO)? Do you wish there was a way to automate the process of creating high-quality, keyword-rich content for your website? Look no further because the ChatGPT Assistants API is here to revolutionize the way you approach SEO autoblogging. With its advanced natural language processing capabilities and ability to generate human-like content, this API is the most advanced SEO autoblogger on the market right now. Say goodbye to the days of spending hours crafting content and let ChatGPT Assistants API do the work for you. In this blog, we will explore the features and benefits of this game-changing tool for SEO autoblogging.
The Most Advanced SEO Autoblogger Right Now: ChatGPT Assistants API
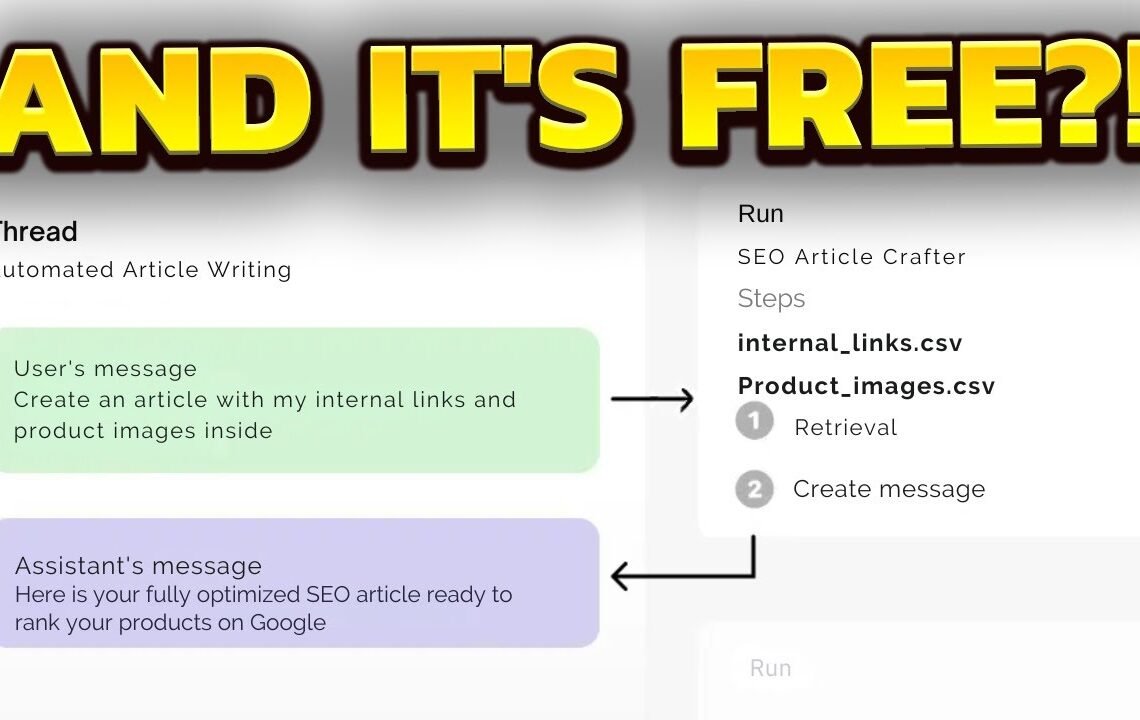
This is the output that you can expect by using this Auto blogger as you can see we have internal links we have lists we have product images etc etc now one thing is the Articles aren’t that long they’re 419 words but as I’ve shown in the past these articles do rank pretty well. Anyway so this is the first Auto blogger that I’ve seen and definitely the first free one that you can use that uses the assistance API and in this video I’m going to show you exactly how to set it up and exactly how to use it so we’re going to be using GitHub so I’ll leave a link to this GitHub in the description and you’re going to need Visual Studio code you’re going to need Python and you’re going to need something called git as well you can get all of that on Google so if you want to get Git in order to use git you just need to go on git download and download it basically it’s pretty simple anyway I’m not going to go too in detail in how to set everything up like the the min new sh like the small parts but I’m just going to focus on the big parts so what do we want to do we want to click on these three terminal new terminal and then we’re going to write get clone and then contrl + V and then you can write anything here uh and that is the name of The file so we’ll press enter here you’ll see this will then clone and then you want to do CD anything here so whatever you call the file we’re now inside that file so we’re going to open that file as well so yeah click on open folder and then Click on the folder and then press select folder so we now have this on the site so I’m going to show you how to do everything how to set up everything etc etc so this is the read me that I made for this so the step first step is the Products this is mainly for e-commerce I haven’t done a non-commerce version just yet what you need is presuming you’re on Shopify is you want to go to your sitemap.xml okay and then um control C control V the products s map so now we’re on the product s map right click Save as and then you want to save the XML and then shown folder drag this over to your um Visual Studio code window you can delete this one which is the current one actually before we delete it right click uh copy relative path so then we’ll delete this and then we’ll rename Your sit map exactly as the old sitemap was called or you can change the script okay if you know what you’re doing with programming then you don’t need to listen to this part anyway okay so what does this do this is basically a way to just get 200 random products I’m going To click terminal new terminal like this you’re going to need python so we’ll do python two men test.py what this will do is it’ll just give 200 random items from your store and it will just list them like this the reason that we need these I’ll show you Right now is because if I go to products. text you’ll see that’s exactly what that is so you can just go to my products. text click inside crl a and then contrl V the ones that you just copied from down here and then press contrl s to save okay so what you want To do is you want to look for the yellow python click on the before the first URL here and then just drag it all the way down okay make sure you copy them all like that and then crl a crl vrl s to save so that’s your product done that’s all you Need to do for that the second step is keywords now I’ve just I’ve got a very very specific way of doing this again you can change these if you want but I wouldn’t recommend it unless you know what you’re doing coding wise I would just leave Them as they are you can take my example and you can say do this for X Niche or do this with these keywords I’ll leave this history the chat history right here so all I did was said following this CSV pass pattern I want you to Output a Content plan using these keywords so you can just triple click on the first line here contrl + C and that’ll give you these here and I’ll also share this uh link right here but basically I just got a load of keywords from Google ads Keyword Planner From a competitor and then just ask it to format them it gave me a weird formatting and I said it needs to be formatted like this and then gave example so again you can just copy a little bit more so first four lines if you want to give it a proper example and Then it understood the assignment and it gave me this you can then press copy right here and then again inside this folder right this file to men it blog content plan expanded if you know what you’re doing you can change that but if you don’t know what you’re doing with Code then do not change the name of these files crl a contrl v that should put your content plan into inside the um CSV now like I said this only writes 400 words more or less right now I could make it do 1,200 or something but I Think for now I’m just going to keep it simple with just doing 400 keywords now one of the only other things we have to do is get the internal link so again we go to tmen uh.it sitemap.xml and we’ll copy collections this time and then I actually have a extension called sitemap to Clipboard that when I click here oops when I click here and press start it will actually give me the collections okay now since I started recently basically using um https in front of this you will probably have to add https to the front of each Of these so another way you can do it instead of using sitemap 2 XML is you can do control a and then contrl C inside the collection sitemap and then contrl a contrl v inside the um Google sheet change it to Black right click here on um the a Cell uh sorry the a row column the a column and press uh sort by Z to A and then do a search for lock and then look for all the collections like this scroll down so click on the first one scroll all the way down to the last one contrl C crl a contrl V and then crl F press these these three buttons find loc and replace it find SL Lo and replace it you now have all your internal links and then you need to put this in a text file so let’s just scroll down once you’ve copied all of the links Then you can open a notepad here or actually you don’t have to you can just go into the the visual studio code window go to internal links press CR a and then control V okay that’s basically all the setup you need now you’re going To need as well open AI so you got to do pip install open AI if you already have it then you have to do dash dash upgrade okay so depending on whether you have it or not if you already have it and it’s an earlier version you will need to upgrade the Version but if you already if you don’t already have it then if you do pip install…
How to Set Up the Auto Blogger
In order to set up the Auto blogger, you need to follow the steps described in this article. It involves creating a sitemap for products, generating keywords and content plans, and obtaining internal links. Additionally, you will need to install and upgrade the OpenAI package to use the API effectively.
Products
The first step involves setting up the products for e-commerce. This section outlines the process to create a sitemap for your products. It also includes instructions on how to extract random items from your store and save them for use in the Auto blogger.
Keywords
Next, the article goes into detail about generating keywords using a specific pattern. It is recommended to follow the provided example to create a content plan using these keywords. The steps to format the keywords and create a content plan are outlined in this section.
Internal Links
Obtaining internal links is an important part of setting up the Auto blogger. This section provides instructions on how to extract internal links from a sitemap, add the necessary formatting, and save them for use within the application.
By following these steps, users can effectively set up the Auto blogger to utilize the ChatGPT Assistants API. The integration of OpenAI is also key to enabling the Auto blogger to generate valuable content based on the provided products, keywords, and internal links.
FAQ: ChatGPT Assistants API
What is ChatGPT Assistants API?
ChatGPT Assistants API is the most advanced SEO autoblogger right now. It leverages the power of GPT-3 to automatically generate high-quality content for blogs and websites, helping businesses and individuals streamline their content creation process.
How does ChatGPT Assistants API work?
ChatGPT Assistants API uses cutting-edge natural language processing technology to understand the context and requirements of the content needed. It then generates coherent and engaging articles or blog posts that are optimized for search engines, saving time and effort for the user.
What are the benefits of using ChatGPT Assistants API for SEO autoblogging?
ChatGPT Assistants API offers several benefits for SEO autoblogging, including:
- Automatic generation of high-quality, SEO-optimized content
- Enhanced productivity and efficiency in content creation
- Ability to tailor the content to specific niches or topics
- Improved search engine visibility and rankings
Is ChatGPT Assistants API suitable for all types of businesses?
Yes, ChatGPT Assistants API is suitable for a wide range of businesses and individuals looking to automate their content creation process. Whether you’re a small business owner, a marketing agency, or a content creator, ChatGPT Assistants API can help you produce engaging and SEO-friendly content consistently.
How can I get started with ChatGPT Assistants API?
Getting started with ChatGPT Assistants API is easy. Simply sign up for an API key, integrate it with your existing platform or website, and start using its powerful capabilities to generate high-quality content for your SEO autoblogging needs.
I hope you find useful my article The Most Advanced SEO Autoblogger Right Now: ChatGPT Assistants API, I also recommend you to read my other posts in my blog.
If you need help with anything join the community or do not hesitate to contact me.
Please consider joining my newsletter or following me on social media if you like my content.
Leave a Reply